SUPPLIES:
- Tie dye kit- Complete with bottles and dye!
- T-Shirt
- Rubber bands
- GLOVES! (Our hands were all stained for quite some time because a few of us chose to skip this step!)
DIRECTIONS:
1) Take your t-shirt and the runner bands and start grabbing different sections and bunching and twisting them. Rope these areas off with a rubber band.
2) Squirt different colors of the dye (after you mix it according to instructions of course!) to the different areas of the shirt
3) let it dry for at least 24 hours
4) Unravel the rubber bands, rinse it in the sink, throw it in the washer and dryer and youre done! here are how ours turned out!....
I did the swirl pattern on mine and if you are interested in the you need to follow these instructions instead...
1) Pinch the shirt in the center
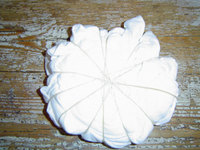
 2) Swirl the T-shirt in a circle around the pinch as tightly as possible, you will form a circle.
3) Take the rubber bands and wrap the shirt creating wedges... like this...
4) Dye each wedge a different color, I chose rainbow order just because I think it's pretty!
This is how mine turned out after I LOVE IT!!!
2) Squirt different colors of the dye (after you mix it according to instructions of course!) to the different areas of the shirt
3) let it dry for at least 24 hours
4) Unravel the rubber bands, rinse it in the sink, throw it in the washer and dryer and youre done! here are how ours turned out!....
I did the swirl pattern on mine and if you are interested in the you need to follow these instructions instead...
1) Pinch the shirt in the center
 2) Swirl the T-shirt in a circle around the pinch as tightly as possible, you will form a circle.
3) Take the rubber bands and wrap the shirt creating wedges... like this...
4) Dye each wedge a different color, I chose rainbow order just because I think it's pretty!
This is how mine turned out after I LOVE IT!!!
Here is our entire team with their lovely handmade tie-dye uniforms!
GO KILLA BEEZ!


