Friday, January 4, 2013

Homemade Lavender Shea Butter Soap


Here is the second soap recipe I used for Christmas gifts for my family. It was also found on www.Soap-Making-Resources.com complete with a kit containing all of the ingredients that the recipe required.  I made 16 bars of this Lavender Shea bar and it ended up being one of my favorites.   I actually love all 6 scents and bars but still, this one is very good!!  Here is the recipe and how-to! Enjoy!


SUPPLIES:
  • Olive Oil = 21.2 Ounces 
  • Palm Oil = 10.6 Ounces 
  • Coconut Oil= 10.6 Ounces
  • Rice Bran Oil = 4.77 Ounces
  • Shea Butter = 3.18 Ounces
  • Castor Oil = 2.65 Ounces
  • Lavender 40/42 Essential Oil = 75 Grams 
  • Colloidal Oatmeal powder= 4 tablespoons
  • Oat Milk = 20 ounces
  • Lye = 7.29 ounces (206 grams) 
  • Gloves
  • 2 Thermometers
  • A pot for melting the oils
  • A bucket for cooling and mixing the lye and distilled water
  • A stick blender
  • A soap mold
  • Parchment paper 
  • A Digital Scale
  • A measuring cup
  • A coffee grinder
  • 5 lb wooden soap mold
  • Dried Lavender Buds for decoration
  • A large towel to wrap the mold in
  • A knife for cutting the soap

DIRECTIONS:

1) Wear gloves and measure out your distilled water oat milk in the bucket you intend on making your lye mixture in.  You can blend oats and make your own if you don't have oat milk on hand- its 1 cup oats, 3 cups distilled water and blend- if you do this strain out the oat particals with a cheese cloth before using it). Now measure the lye and add it to the distilled water oat milk. Do this near a window, it gets stinky! Place the thermometer into the solution and wait for it to cool to about room temperature. 

2) Measure your Olive Oil, Coconut Oil, Palm Oil, Castor Oil, Shea Butter and Rice Bran Oil in grams or ounces with your digital scale and a add it to the pot you have for melting the oils.  Place this pot over low heat until all of the oils melt together.  Once they are melted place your second thermometer inside this pot and set it aside to wait for it to cool to room temperature also.  You can place both the pot of oils and the bucket of lye mixture in an ice bath if you'd like to speed up the process

3) Now measure out your Lavender Oil and set it aside for later use.  You are also going to want to take your whole oats (NOT INSTANT!!) and grind them up on the coffee grinder to make almost an oat powder and set that aside also, this is the Colloidal Oatmeal powder. 

4) Now take your soap mold and line it with parchment paper.  Set it aside also.

5) When your oils and lye mixture have cooled you want to combine them slowly while stirring.  When they are a smooth and even texture add the powdered oats and the lavender oil.  Now mix the batch with the stick blender until it is the constancy of thick yogurt.  This is called reaching trace.  You will be able to tell you are at trace by dribbling a little of the soap mixture on top of the batch and seeing if it settles on top or is immediately absorbed into the liquid.  If it settles on top you have reached trace.

6) Pour your soap mixture into the mold, sprinkle some lavender buds on top, cover it, wrap it in a towel and let it sit overnight.  

7) The next day (AT LEAST 24 HOURS LATER!) Remove the lid and towel and cut your soap into 16 even bars.  Place on a cooling rack in a well ventilated area to cure for 6 - 8 weeks, flipping each week.  

TA DA! You're done! 16 home-made bars of soap!  


Wednesday, January 2, 2013

Homemade Clove Honey Oatmeal Soap

Every year I like to craft or make something as a Christmas gift for my family.  This year I started thinking about what to make for everyone a little early, as in October, and thankfully I did! I stumbled upon a bunch of beautiful soap recipes and decided I wanted to try it out.  Making the soap was so much fun and they turned out so beautiful I actually ended up making six different kinds.  The first one I made is this Clove Honey Oatmeal soap that I found at www.Soap-Making-Resources.com  That site is AWESOME and you can buy the kit complete with all of the supplies right from it.  Here is what you need and how to make it! 


SUPPLIES:
  • Olive Oil = 26.5 Ounces
  • Coconut Oil (76 Degree) = 10.6 Ounces 
  • Sweet Almond Oil = 6.4 Ounces 
  • Avocado Oil = 5.3 Ounces 
  • Castor Oil = 4.3 ounces
  • Honey = 2.5 ounces
  • Almond Milk = 6 ounces
  • Whole Oats = 2 ounces
  • Orange, sweet essential oil = 45 grams
  • Clove Bud essential oil = 30 grams
  • Distilled Water = 12 ounces
  • Lye = 7.281 ounces (206 grams)
  • Gloves
  • 2 Thermometers
  • A pot for melting the oils
  • A bucket for cooling and mixing the lye and distilled water
  • A stick blender
  • A soap mold
  • Parchment paper 
  • A Digital Scale
  • A measuring cup
  • A coffee grinder
  • 5 lb wooden soap mold
  • Optional- Bubble wrap and extra oats for decoration
  • A large towel to wrap the mold in
  • A knife for cutting the soap
DIRECTIONS:

1) Wear gloves and measure out your distilled water in the bucket you intend on making your lye mixture in.  Measure the lye and add it to the distilled water stirring until the mixture becomes clear. Do this near a window, it gets stinky! Place the thermometer into the clear solution and wait for it to cool to about room temperature. 

2) Measure your Olive Oil, Coconut Oil, Sweet Almond Oil, Castor Oil and Avocado Oil in grams or ounces and a add it to the pot you have for melting the oils.  Place this pot over low heat until all of the oils melt together.  Once they are melted place your second thermometer inside this pot and set it aside to wait for it to cool to room temperature also. 

3) Now measure out your Almond Milk (you can blend almonds and make your own if you don't have almond milk on hand- its 1 part almonds, 3 parts distilled water and blend),  Honey (I added warm distilled water to the honey to make it easier to pour too), Orange Oil and Clove Oil in separate containers and set them aside for later use.  You are also going to want to take your whole oats (NOT INSTANT!!) and grind them up on the coffee grinder to make almost an oat powder and set that aside also. 

4) Now take your soap mold and line it with parchment paper.  Set it aside also.

5) When your oils and lye mixture have cooled you want to combine them slowly while stirring.  When they are a smooth and even texture you add your almond milk and honey water and keep stirring.  Then add the powdered oats and both the orange and clove oils.  Now mix the batch with the stick blender until it is the constancy of thick yogurt.  This is called reaching trace.  You will be able to tell you are at trace by dribbling a little of the soap mixture on top of the batch and seeing if it settles on top or is immediately absorbed into the liquid.  If it settles on top you have reached trace.

6) Pour your soap mixture into the mold, sprinkle some oats on top and press the bubble wrap into the top of the mixture. Cover it and wrap it in a towel and let it sit overnight.  

7) The next day (AT LEAST 24 HOURS LATER!) Remove the lid, towel and bubble wrap and cut your soap into 16 even bars.  Place on a cooling rack in a well ventilated area to cure for 6 - 8 weeks, flipping each week.  

TA DA! You're done! 16 home-made bars of soap!  


Thursday, April 26, 2012

Tie-Dye T-Shirt Project

Our softball team didn't want to go through the work of getting a sponsor so we decided not to have one and instead of getting custom printed jerseys we would make our own!  It turned out to be a blast! The team came over to my house, we set up a large table in the garage and we all brought t-shirts, rubber bands, tie-dye kits and of course snacks and drinks! Our shirts turned out AWESOME! Here is the How-To for tie-dye t-shirts!


SUPPLIES:
  • Tie dye kit- Complete with bottles and dye!
  • T-Shirt
  • Rubber bands
  • GLOVES! (Our hands were all stained for quite some time because a few of us chose to skip this step!)
DIRECTIONS:

1) Take your t-shirt and the runner bands and start grabbing different sections and bunching and twisting them.  Rope these areas off with a rubber band.


2) Squirt different colors of the dye (after you mix it according to instructions of course!) to the different areas of the shirt


3) let it dry for at least 24 hours


4) Unravel the rubber bands, rinse it in the sink, throw it in the washer and dryer and youre done! here are how ours turned out!....


I did the swirl pattern on mine and if you are interested in the you need to follow these instructions instead... 


1) Pinch the shirt in the center


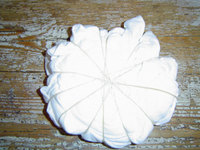
2) Swirl the T-shirt in a circle around the pinch as tightly as possible, you will form a circle.


3) Take the rubber bands and wrap the shirt creating wedges... like this... 


4) Dye each wedge a different color, I chose rainbow order just because I think it's pretty! 


This is how mine turned out after I LOVE IT!!! 


Here is our entire team with their lovely handmade tie-dye uniforms!
GO KILLA BEEZ!


Wednesday, April 25, 2012

Folded Cloth Flower Pins


I was bored and cruising around StumbleUpon when I ran across this  AWESOME idea complete with a How To video! I immediately ran out and bought the supplies and made a ton of flowers.  I made four for a bag and then I made about 15 others and turned them into ornaments and gave them as Christmas gifts.  Here is the How To...

SUPPLIES:

  • Fabric
  • Glue
  • Needle
  • Thread
  • Buttons


DIRECTIONS:

Follow these instructions at this link...

Refurbished Rocking Chair Part One


I wanted a rocking chair for my front porch because i live in the country and enjoy drinking coffee in the morning and reading outside.  I found this one at the local Goodwill store for only $20 so i bought it. The wood was split down the middle and really dirty so it took some work to revitalize it but now it is looking good and almost complete.  Here is the how to for sprucing up old furniture and refurbishing chairs...

SUPPLIES:
  • Rocking Chair
  • Sanding Blocks
  • Wood Glue
  • A Wet Towel
  • Sealer and Primer Spray Paint
DIRECTIONS:


1) Take the wood glue and seal each crack of the chair.  You have to hold it for awhile until it sticks or it will shift and dry off center.


2) Once it is dry, take the chair outside on a nice day and sand every single part of it.  This will remove the grimy top layer and reveal fresh wood.  It will also open the pores up for your sealer and primer to sink in.


3) Spray every surface of the chair with the sealer and primer.  Let it dry.

YOU'RE DONE WITH PART ONE! Here is how it should look!


Wine Cork Coasters


I have a lot of painted furniture and therefore am obsessed with coasters so the finish doesn't get ruined.  I have been wanting to craft some coasters of my own but couldn't find an idea that i really liked and wanted to recreate until i found this one.  It involves wine corks and I happen to have a ton.  I have been saving them from our Girls Nights and have some friends from a local bar who gave me an entire Crown Royal bag full of corks from the bar.  Here is the How To...
SUPPLIES:
  • Corks
  • Hot Glue
  • Strong Scissors
  • Ribbon
DIRECTIONS:

1) Take your wine corks and cut them in fourths. It takes alot of muscle and strong scissors but it can be done!

2) Glue the pieces together with the hot glue gun side by side to form a circle.

3) Let it dry and glue a ribbon around the outside (if you don't want to it does look cool with the sides of the wine corks showing so you can skip this step if you like it as is!)

YOU'RE DONE!


Here is how they should look....

Chalkboard Wine Glasses


I host a Girls Night once a week with my best friends.  We hang out, chat, eat all sorts of good snack and of course, drink wine!  As our girls night became more popular we had more and more attendees.  Now, there are about 6-8 regulars.  With this increased number my amount of available wine glasses was decreasing and we were getting mixed up as to whose wine glass was whose. That is where I felt this project came in handy! I will show you how to use one of my favorite craft supplies (chalkboard paint!) and some wine glasses to make sure you don't ever have the issue of not knowing which glass is yours.  Here is the How To!

 
SUPPLIES:
  • Wine Glasses
  • Chalkboard Paint
  • Tape
  • Chalk
DIRECTIONS:

1) Take the wine glasses and wrap a strip of tape 1/4 a way up the stem of the glass around it creating a straight line.

2) Spray the bottom of each glass with a few coats of Chalkboard paint below the strip of tape.

3) Let it dry.

4) Peel off the tape and write your name on the base of your glass! TADA!


You're done!  Here is how it should look...


Wednesday, April 18, 2012

Mod Podge

Mod Podge is one of my favorite crafting supplies, you can use it for practically anything! It is a glue, a sealer, a glaze, a decoupage product and many other things. 

They also have so many different kinds of Mod Podge out there!  On their website... The Mod Podge Website , you can see all of the different kinds from Antique to Gloss and they even have a link to their own craft blog. 

On their blog they show all different types of projects you can do that incorporate Mod Podge. It was really awesome!  Here is the link to that blog...Mod Podge Rocks! I may have to craft some of their ideas and show you how mine turn out!

Here is an image of their sample pack.. I want it!


I used Mod Podge for my "Silhouette ‘Birds in a Tree’ Wall Art ... here is a link to that How-To in case you haven't seen it!: Silhouette 'Birds in a Tree' Wall Art.  I want to use it for other projects, I have some more in mind so I am excited about that!


What are your Mod Podge experiences?

Monday, April 16, 2012

Hanging Party Decor

We had a New Years Eve Party this year and wanted to make some homemade decorations.  Here is a Hot To on one of them that we decided on! 
SUPPLIES:

  • Card stock Paper - All different kinds (I chose the glitter kind for effect)
  • Ribbon- All different kinds
  • Scissors
  • Glue
  • Tacks
  • Hole Punch
DIRECTIONS:

1) Glue the large pieces of paper together back to back so that the image or color/glitter is facing out on those sides.

2) Cut all different sized circles out of each sheet. 

3) Punch a hole and the top and bottom of each circle

4) String the hole from the top of one circle to the bottom of the other to make a chain.

You can do as many or as few as you'd like, we did about 8 on each chain and then hung them  by a tack from the ceiling.  They looked really cute and sparkled as they turned, it was easy, cheap and fun!


What do you think?

Friday, April 13, 2012

Homemade Gift- Cookie Jar w/ Recipe


I made these jars as Christmas gifts for close family and friends and they came out really nice.  You just take a mason jar and cookie recipes and fill the jar with all of the dry ingredients needed for the cookie you chose, type up a recipe card and decorate the jar!  It was really fun and the cookies turned out great.   I made Oatmeal Chocolate Chip, Cranberry Hootycreeks and Toffee Blondies. Here is the How-To and some photos!


SUPPLIES:


  • Mason Jar with Lid
  • Ribbon
  • Felt
  • Patterned Fabric
  • Hot Glue Gun/ Glue
  • Scissors
  • Card-stock Paper
  • Computer with Printer
  • All dry cookie ingredients


DIRECTIONS:

1) Take your mason jar and layer each dry ingredient from your cookie recipe carefully.  You want them to be straight across so that you can see it is layered and so it looks nice! I used a spoon to spread and even out the sugar, flour and what not in the jar on the sides before adding the next layer. 


 (I forgot to take an 'in process' layering photo so I found this one on 
the internet to illustrate my point, hope it helps!)

2) Now that you have all of your dry ingredients layered you need to type up a recipe card with the directions on how to make the cookies.   I put all of the ingredients that are in the jar and their measurements listed in a column on one side and then what they needed to add in a second column and then the instructions for mixing and baking underneath.  I typed them up in a fun font and printed them out on decorated paper.  Then I cut them out with scissors that had decorated edges so it looked more fun. 

3) I used a ribbon and wrapped the recipe card against the jar and tied the ribbon tight so that the card was attached to the jar but easily removable by untying the bow. 

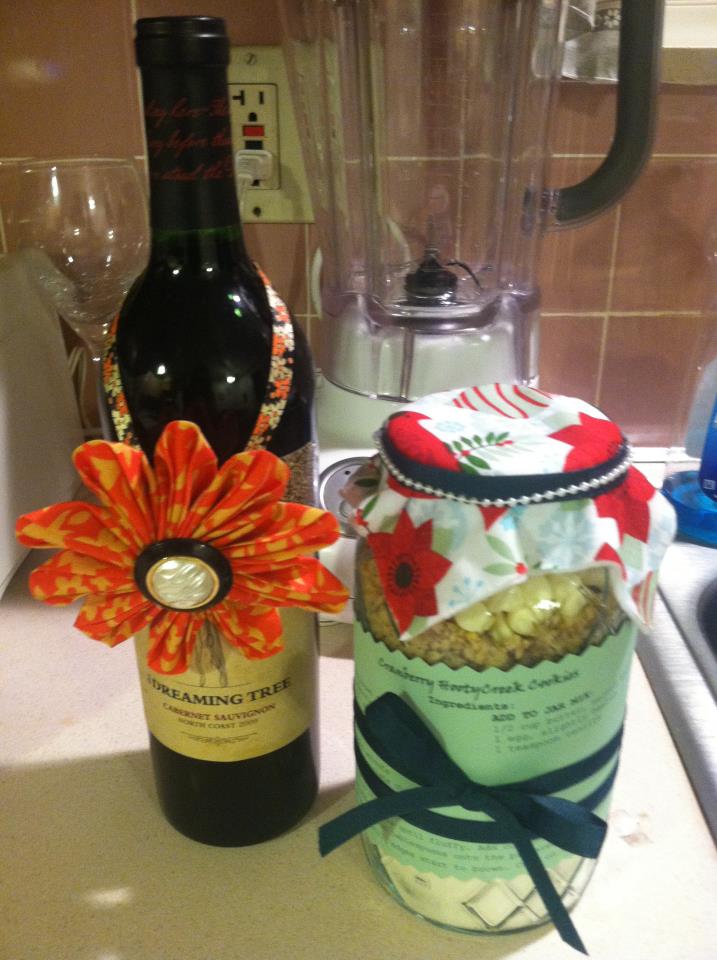
4) Then I took the lid of my jar and cut a square piece off felt long enough to cover the side of the metal lid and hang over a bit so it looked nice.  I glued the patterned fabric to the felt and glued the entire thing to the lid.  Then I used the same ribbon used to attach the card to tie around the rim of the lid and over the felt for extra security and decor.  

Here is how they turned out...  


I LOVED THEM! I think it was a nice gift and they were fun to make and they are easy to enjoy.  We kept a jar for our self and we loved it too!

What do you think?  

Monday, April 9, 2012

Ribbon Organizer

For Christmas I decided to make homemade gifts for the people I care about.  I love to craft and thought spending time making things would be more fun then analyzing the store shelves and searching for the perfect gift.  I decided on making ornaments for Christmas trees as well as Cookie Recipe Jars.  I will be posting a 'How-To' on both of those shortly but that isn't the point of this post.  The point of this post is to tell you both of those crafts required a lot of different kinds of ribbon to make them unique and my ribbons were not well organized, until now!  


At first I just had a bin under my craft table where I would stack the miscellaneous spools of ribbon but that became really messy so quickly!  Because it was such a mess I decided to research some organization techniques for all of my ribbons, that is when I found this AWESOME idea!  


All you need is a plastic basket/container with little holes along the side and a long skinny kabob stick of some kind.  You place the ribbons on the stick via the hole in the center of the spool and stick it inside the basket and then poke the end of the ribbon out of a hole and you have easy access to a well organized supply of ribbon! Here is a visual so you can see what I am talking about.  I highly recommend organizing your ribbons his way, it is cute and easy to use!


I highly recommend organizing your ribbons his way,
 it is cute and easy to use!


Friday, April 6, 2012

Refurbished Side Table

I found this tri-fold table in my mothers basement and decided I could refurbish it.   I wanted to make it a cool side table to match our dark wood end table that is between the plants with the green drawer from an earlier post.  Here is the how to!


SUPPLIES:

  • Table
  • Chalkboard Paint
  • Painters Tape
  • Colored Paint
  • Paint Brush
  • Sandpaper
DIRECTIONS:

1) Take the table and make sure it is sanded smooth.


2) Tape off the sides of the table (and in the case of mine the center where it folds!)


3) Clean off the top and spray paint it with a few coats of the chalkboard paint. I believe the can says at least three.


4) Once it is dry remove that tape and tape the top edges.


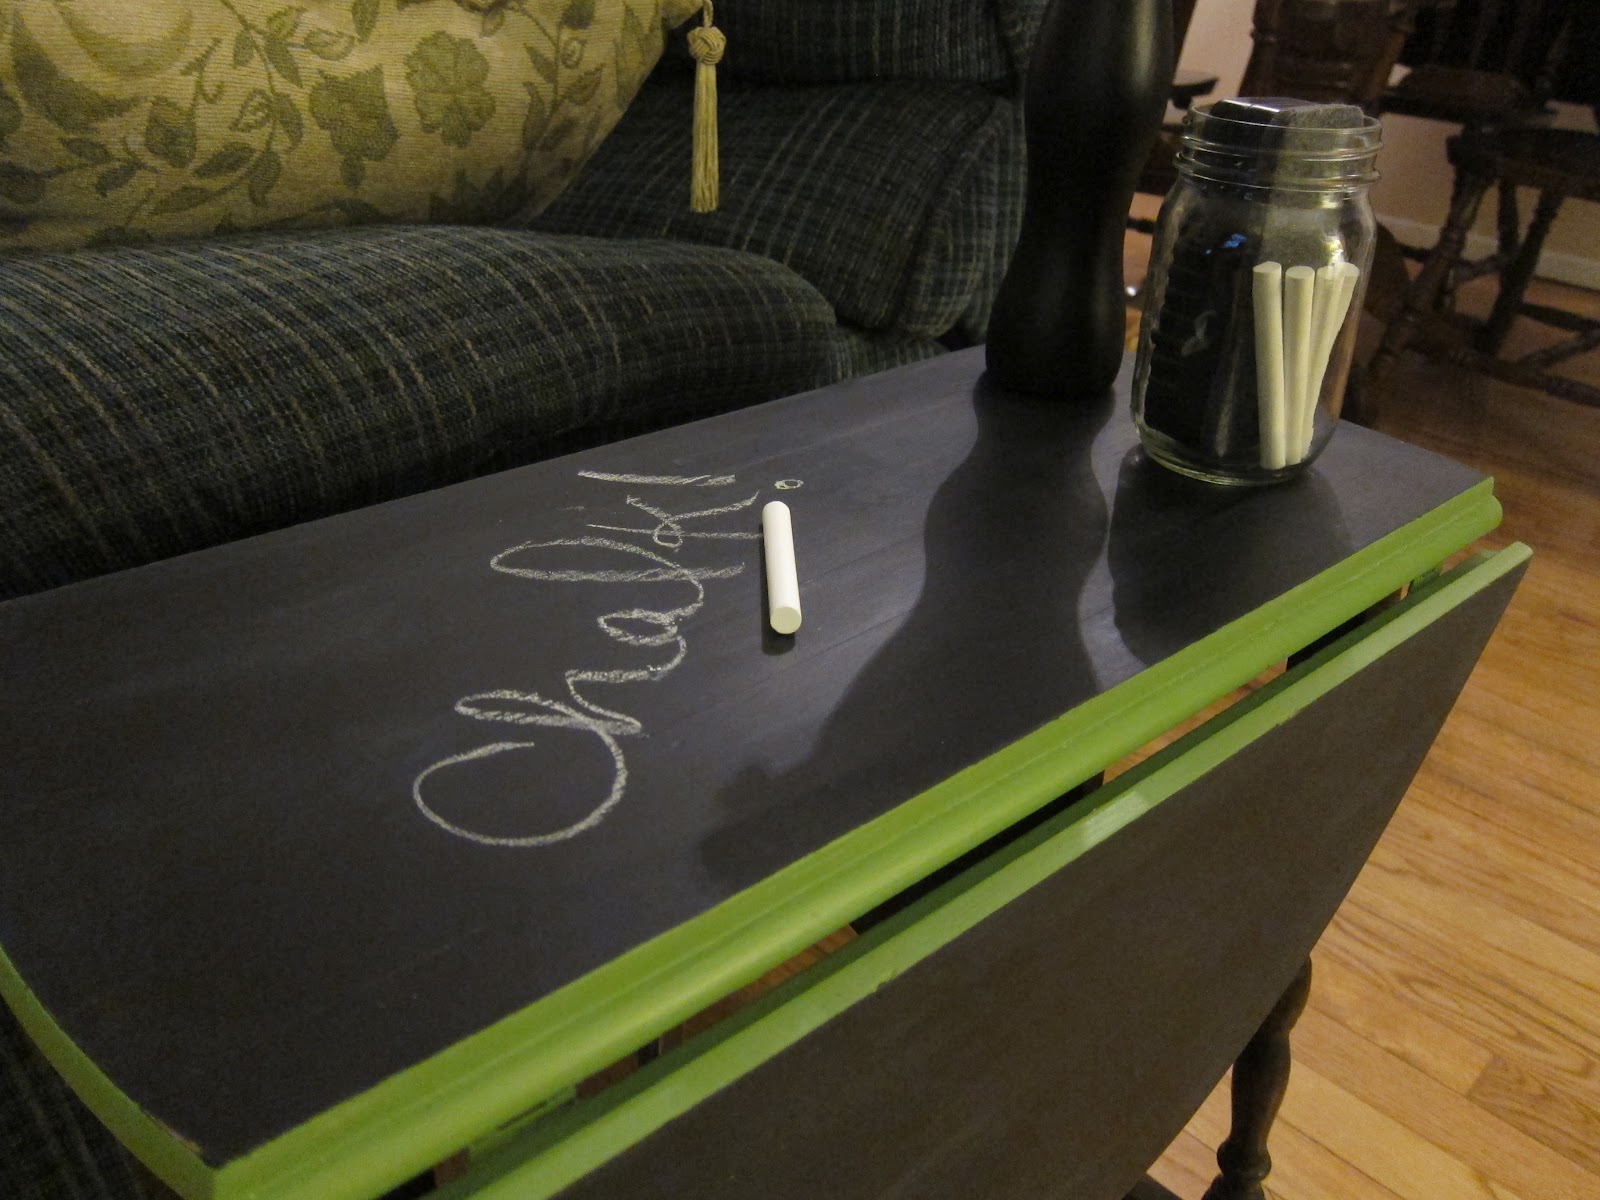
5) Hand paint the edges (and in my case center) with the color that you chose.  I chose green to match a drawer on another piece of furniture in our house that I mentioned above. 


6) Let it dry and you're done!! 


Here is my photos and how they turned out!....


What do you think? What would you do differently?


Wednesday, April 4, 2012

Chalkboard Paint

I have a serious obsession with chalkboard paint.  I love being able to write little messages and doodle on my furniture and chalkboard paint affords me that luxury! Thankfully, Brian likes it too!  Chalkboard paint is so cool and really easy to use.  I have done two vases, four terracotta pots and a table so far and they have all turned out awesome on all surfaces, glass, terracotta and wood.  You just do a few thin coats (at least 3) and then once is it dry you rub a piece of chalk over the entire surface, erase it and you are good to go!  The paint even looks cool when it isn't being drawn on or utilized.  It is a flat, matte black paint that matches with everything.  I want to use it for everything now!  The cost is about $7 a can and it covers a lot of area.  


                              Here is my favorite kind...


If you are looking for a cool way to spruce up an item I would definitely recommend the Chalkboard paint.  You can get it in spray paint or a can.  I think it looks great and it is really fun.  You can change the piece you've painted daily with new drawings or words, you can send notes and you can have fun with your furniture!


Monday, April 2, 2012

Martha Stewart's Encyclopedia of Crafts


I have been obsessed with crafting for awhile now and the people closest to me have, for obvious reasons, realized this.  Well, come Christmas time this year, much to my enjoyment, I received a lot of gifts pertaining to my hobby.  One of them was from my dear boyfriend Brian. He gave me the COOLEST book! It is called...

"Martha Stewart's Encyclopedia of Crafts
An A-to-Z Guide with Detailed Instructions and Endless Inspiration."  


It is FULL of ideas and How To's on all sorts of different crafts like botanical pressing, decoupage, rubber stamping and glass etching. I am SO excited! So, if you are looking for a new project I would buy this book. It is full of tons of inspirational ideas and how-to's, it is very detailed and the ideas are great.

Friday, March 30, 2012

Mason Jar Key Holder Part 2


Ok, here is Part 2!

SUPPLIES:

  • 2 Hooks for your keys
  • Hammer
  • Nails
  • A Pipe Clamp
  • A Mason Jar
  • Fake Flowers
  • Picture Hangers
  • A Ruler
DIRECTIONS:

1) Nail in the picture hangers on the back first, it will be harder to do this when there are hooks on the front because the board won't lay flat. 


2) Measure three places on the front of the board that you want your hooks and the decorative jar to be.


3) Nail in the two hooks for your keys in the holes you have measured.


4) Nail in the pipe clamp for the mason jar.  


5) Slip the jar in the clamp, tighten it and add the fake flowers.  You're done!!


Here is the photo of my key holder, I love it.  Brian uses it every day so my kitchen table is free of his keys and it looks nice at the entry way to our home.


What flowers would you chose? Would you do something different? 

Wednesday, March 28, 2012

Mason Jar Key Holder Part 1


How I wanted a place for our keys when we came home because Brian kept putting his on the kitchen table and it was ruining my decor.  I previously kept mine in my purse but would constantly get irritated when I couldn't find them (I tend to always have rather large purses...). Anyway, through www.StumbleUpon.com I found this awesome idea and got to it right away.  It's a big project so I am going to do it in two staged.  Here is Part 1.

SUPPLIES:

  • A Wooden board
  • Grey Spray Paint
  • A Tea Light Candle
  • Off White Latex Paint 
  • A Paint Brush
  • Sandpaper
DIRECTIONS:

1) Take your board and spray paint it grey.  


2) When it dries take the candle and rub the wax on the corners and in random spots on the board.  This is actually a really cool painting technique.  On top of the grey spray paint you are going to paint a coat of the latex paint.  Then after it dries you are going to sand it in the places where you rubbed off the wax from the candle.  It makes a really cool antique look because the grey paint shines through slightly and it looks like worn wood.  


3) After the spray paint dried and you have rubbed off the wax onto the board in the places you like, paint it with a coat of latex paint.


4) When the paint dries lightly sand the board focusing on the areas that you waxed.  


Here is what it should look similar to...


That's Part 1! Part 2 to come! 

Monday, March 26, 2012

Scrapbook Paper Tree Branch Centerpiece

This is one of the coolest centerpieces I have ever made.  I get a ton of compliments on it and it fits every season.  I saw a similar idea from a Pinterest post but altered it a bit.  It was a tedious task because it involved lots of cutting and gluing but it is something you can do over time while just watching a movie or relaxing with friends.  Plus, you can do what I did have solicit help cutting out leaves :) 


Here is the How-To...
SUPPLIES:
  • TONS of Scrapbook Paper, I have no clue how many sheets I used but it was a lot!
  • Scissors
  • Tree Branches
  • Glue (I LOVE the GEM-TAC, here is the link to a previous post I did about how awesome it is...  GEM-TAC Post)
  • Vase
  • Sand
  • Chalk


DIRECTIONS:

1) Fold your scrapbook paper in half.  Cut leaves out with the sheet back to back, that way they are the same shape with the design on both sides.  You are going to need a million of these! 


2) Glue the leaves together. You glue both blank sides of the paper together so the design view is facing outward on both sides of the leaf.  You may need to trim them up a bit to make sure they match and there isn't any white paper sticking out.


3) Once they have dried you need your tree branches.  Now you want to glue each leaf to the branches in the same design as nature.  Try to mimic how real trees produce leaves by placing your fake leaves in locations that are similar to a tree outside. I also found it easier to curl the end of the paper leaf I was gluing it around the branch and then place the glue in the curl and wrap it around the branch.  You may have to hold the leaf in the position you want for a minute so the glue can firm up and will keep the leaf in the position you planned. 


4) Let the branches full of leaves dry and take your vase (I spray painted mine with Chalkboard paint because I thought it would look cool and wrote 'Bloom' on it in script) and fill it with sand.  Once the branches are dry the sand in the bottom of the vase will give you the ability to position them and the security to help them stand on their own.  


You're done! here is my final product! Thoughts?


What would you do differently?